
There's a category of map you can't build from a spreadsheet, because the data doesn't exist yet — potholes nobody has reported, businesses nobody has listed, wildlife nobody has logged. For those, the map has to collect its own data. This guide covers building one that gathers useful submissions without drowning you in spam.
What a crowdsourced map is
Visitors drop a pin where something is, fill in a form you designed, and submit. The submission lands in a moderation queue. You review it, and if you approve it, the pin appears on the public map.
That review step is the whole design. An unmoderated public map is a defacement target within days; a moderated one is a genuinely useful shared record.
What people build with them
- Civic reporting — potholes, broken streetlights, fly-tipping, blocked paths
- Community directories — local businesses, community fridges, accessible venues
- Field and citizen science — wildlife sightings, invasive species, water quality readings
- Events and listings — markets, gigs, open studios
- Photo contests and campaigns — place-based submissions with images
- Reviews and condition reports — trail conditions, facility state
Step 1: Decide where pins can go
Before designing the form, set the submission area. Four options:
- Global — anywhere on Earth. Right for a wildlife survey, wrong for a city reporting tool.
- Region — a country, state, province, county or NUTS region, picked by name from the same boundary catalog the choropleth map uses. The fastest route to a real administrative border, and the right choice whenever your area is one — "anywhere in Serbia", "these three counties".
- Bounding box — a rectangle. Quick, and fine for a roughly rectangular area.
- Polygon — a shape you draw. For a boundary that isn't administrative: a park, a campus, a delivery zone.
Region boundaries are simplified for display, so a pin within a few hundred metres of the border may fall on either side. That is the right trade for telling Serbia from Hungary; if you need an exact line, draw the polygon.
Restricting the area is your cheapest quality filter. If a pothole report can only be dropped inside your city limits, you've eliminated an entire class of junk before it arrives, and visitors get an immediate, obvious cue about what the map is for. The area renders as a spotlight: everything outside it is dimmed, and the region you accept is a clear window.
Step 2: Design the form
Fourteen field types are available: short text, long text, number, email, URL, date, time, phone, star rating, dropdown, radio buttons, multi-select, checkbox, and image upload. The Crowdsourced Map reference has the full list with each one's options.
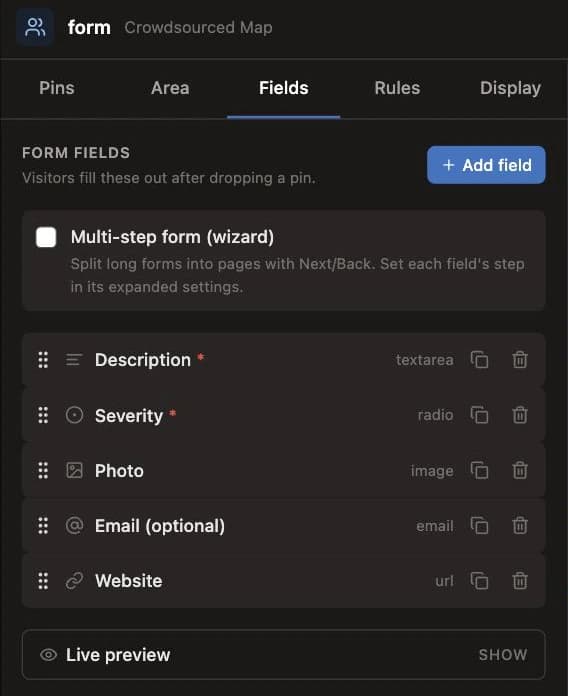
Six ready-made templates cover the common cases — pothole report, business listing, photo contest, event submission, site review, and sighting log. Start from one and edit it rather than building from scratch.
The rules that actually improve submission quality:
- Ask for less. Every extra field costs you completions. A pothole report needs a photo, a severity, and maybe a description. It does not need the reporter's job title.
- Prefer dropdowns over free text for anything you'll later filter or count. "Pothole / Streetlight / Fly-tipping" gives you a usable category; a text box gives you 40 spellings of "streetlight".
- Use validation. Minimums, maximums, length limits, and patterns catch bad input at submission time, when the person can still fix it.
- Use conditional fields. A field can appear only when an earlier answer has a particular value, so the form stays short and only asks the follow-up questions that apply.
- Split long forms into steps. A three-step form reads as easier than one long scroll, even when it asks the same questions.
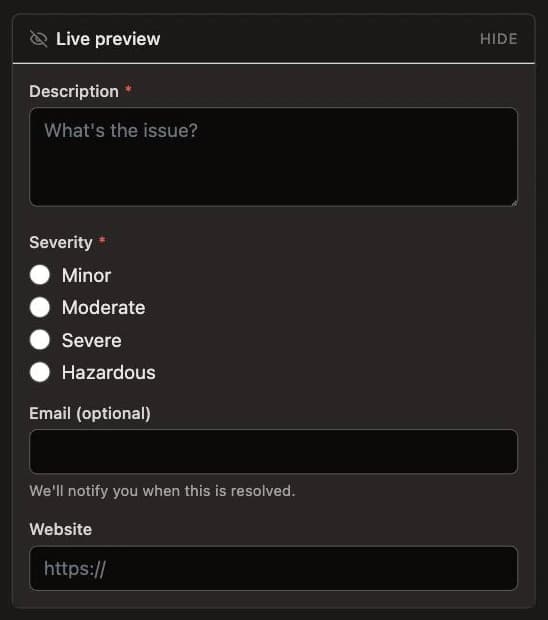
A live preview shows exactly what visitors will see, so check it on a narrow screen before publishing.
Step 3: Set up spam protection
Anything public and anonymous attracts junk. There are several layers, and they compose:
- CAPTCHA — the biggest single reduction in automated spam.
- Rate limiting — a per-IP limit and a daily cap, so one source can't flood the queue.
- Honeypot — a hidden field bots fill in and humans never see. Free, and catches unsophisticated scripts.
- Allowed origins — restricts submissions to the domains you list, so people can't post to your endpoint from elsewhere.
- Image checks — uploads are inspected to confirm they're actually images.
Every submission also carries a record of where it came from — IP address and its reverse-DNS hostname, browser, operating system, whether it was a phone, tablet or desktop, approximate country and city, and the page it was submitted from. It's in each submission's details in the map editor and in the CSV export, and it's what turns "these twelve look fake" into "these twelve came from one datacenter IP in four minutes."
On privacy: that includes personal data. Only you see it — none of it is published to the public map — but if you collect submissions from the EU or UK, say so in your own privacy notice.
Step 4: Moderate
Submissions arrive as pending, and you review them in the map editor's Pins tab — a list of every submission beside the map, with each pin coloured by its status. From there you can approve, reject, or mark as spam — individually or in bulk — and open any submission to see everything it carries and step through the queue one decision at a time.
Two features that matter more than they sound:
- You can edit before approving. Fix a typo, correct a category, or move a misplaced pin by correcting its coordinates. Most submissions are useful but slightly wrong, and this turns them into good data instead of rejections.
- Submissions render against the form they were submitted with. Change the form later and old submissions still display correctly, rather than showing blanks where fields used to be.
If review volume is the bottleneck, auto-approval is available — but pair it with a CAPTCHA and a restricted area, and keep an eye on the queue.
Step 5: Decide what's public
Approved submissions don't have to appear publicly, and you control how much shows:
- Hidden — collect data without a public map. Right for internal reporting.
- Pins — markers only.
- Details — markers that open a popup with the submission's details.
Crucially, only the fields you explicitly publish appear publicly. Everything else stays server-side. So you can ask for a reporter's email for follow-up and never expose it on the map — which you should, because a public map of email addresses is a harvesting target.
Approved pins can render as individual markers, clustered, or as a heatmap, depending on volume.
Step 6: Close the loop
Two things stop a crowdsourced map feeling like a black hole:
Instant feedback. After submitting, the visitor's own pin appears on the map immediately in a distinct color, until they reload the page. They can see their contribution landed without waiting for moderation.
Webhooks. You can fire an HTTP request when a submission is created, approved, rejected, or marked as spam — each event opt-in. That's how you get new reports into Slack, a ticketing system, or your own database without anyone watching a dashboard. Deliveries are signed, retried on failure, and logged.
Submissions also export as CSV whenever you want the raw data.
A realistic first launch
Restrict the area, use a template, ask for four fields, turn on the CAPTCHA, keep manual moderation, and publish approved pins with details. Then watch what people actually submit for a week and adjust — you'll learn more from twenty real submissions than from any amount of planning.
Build a crowdsourced map — free to start.